How to Clean a Suppressor: Complete Guide for User-Serviceable Models
Soak baffles in solvent (CLR, Hoppes, or ultrasonic cleaner), scrub with nylon brush, dry thoroughly.
Last updated: June 6, 2026 · Originally published: March 8, 2026
In This Article
- How to Clean a User-Serviceable Suppressor: Step-by-Step Guide
- User-Serviceable vs. Sealed: Can You Clean Yours?
- What You Need to Clean a Suppressor
- How to clean a suppressor — Rimfire Suppressor Cleaning: The Most Demanding Process
- How to clean a suppressor: Centerfire Pistol Suppressor Cleaning
- How to clean a suppressor: Centerfire Rifle Suppressor Cleaning
- How to clean a suppressor: Ultrasonic Cleaning for Suppressors
- How to clean a suppressor: Thread Lubrication at Reassembly
- What Not to Do When Cleaning a Suppressor
- Frequently Asked Questions About Cleaning User-Serviceable Suppressors
How to Clean a User-Serviceable Suppressor: Step-by-Step Guide
Proper how to clean a suppressor keeps your suppressor performing at spec and extends its service life. Cleaning a user-serviceable suppressor is a straightforward process that extends service life, maintains sound performance, and prevents the seized components and corrosion damage that result from neglected fouling — and it requires nothing more exotic than a quality solvent, a nylon or bronze brush, a dry cloth, and the disassembly tools that most suppressor manufacturers include with purchase. The suppressor’s job is to capture and cool hot, gas and particulate-laden propellant gases on every shot, and over time the carbon, lead, and unburned powder that accumulate in the baffles degrade both sound performance and long-term component integrity. Knowing when and how to clean your specific suppressor keeps it performing at its design specifications through tens of thousands of rounds.

This guide covers the complete cleaning process for user-serviceable suppressors: disassembly sequence, solvent selection for rimfire vs. centerfire applications, ultrasonic cleaning procedures, proper reassembly and thread lubrication, and the cleaning intervals that match different calibers and use intensities. Understanding what to do — and what to avoid — keeps your suppressor performing and lasting as long as possible.
Key Takeaways
- Only user-serviceable suppressors can be cleaned by owners — sealed suppressors return to manufacturer for service
- Never use steel brushes — bronze brushes only to protect baffle surfaces and anodizing
- Appropriate solvents: Slip 2000 Carbon Cutter, Otis Defender, foam bore cleaners. Avoid Hoppe’s No. 9 on aluminum
- Dry completely before reassembly — trapped moisture causes accelerated corrosion
- Rimfire suppressors: clean every 500–1,000 rounds. Centerfire: every 3,000–5,000 rounds or annually
User-Serviceable vs. Sealed: Can You Clean Yours?

Not all suppressors are designed to be disassembled by the user for cleaning. Sealed or fully welded suppressors — common in some budget designs and in suppressors engineered for minimum assembly complexity — cannot be field-stripped and must be sent to the manufacturer for service or replacement when fouling becomes problematic. User-serviceable suppressors are specifically designed with removable end caps, removable baffle stacks, or both, allowing the owner to disassemble, clean, and reassemble the suppressor without specialized tools beyond what the manufacturer provides. Before attempting to disassemble any suppressor, verify that your specific model is user-serviceable by consulting the owner’s manual or manufacturer’s website. Attempting to disassemble a sealed suppressor can damage the finish, strip threads, or permanently damage end cap retention features. Popular user-serviceable suppressor lines include the Silencer Central Banish series, Rugged Suppressors Obsidian and Surge, Dead Air Mask and Sandman lines, SilencerCo Sparrow (Silencer Central) and Omega series, and Gemtech GMT-300 and Dagger.
What You Need to Clean a Suppressor

Gather the following before beginning: the suppressor wrench or disassembly tool provided by the manufacturer (or an appropriate substitute); a quality cleaning solvent appropriate for your caliber (more on this below); nylon or bronze brushes in appropriate sizes for your baffle stack; clean lint-free patches or rags; a parts tray or clean work surface to prevent losing small components; dry lubricant or anti-seize compound for thread reassembly; and patience. Do not use steel brushes on aluminum baffle surfaces — steel bristles scratch aluminum and remove protective coatings. A cleaning rod or wooden dowel can help dislodge fouling from the baffle bore openings. Some suppressor owners use an ultrasonic cleaner, which dramatically speeds the process for heavily fouled rimfire suppressors — if you plan to clean rimfire suppressors regularly, an ultrasonic cleaner is a worthwhile investment.
How to clean a suppressor — Rimfire Suppressor Cleaning: The Most Demanding Process
Rimfire suppressors accumulate the most fouling per round of any suppressor type, due to the lead bullet construction and rimfire priming compound used in .22 LR and .22 WMR ammunition. The fouling is thick, sticky, and bonds to baffle surfaces more stubbornly than centerfire carbon fouling. The recommended cleaning interval for rimfire suppressors is every 500–1,000 rounds under regular use — more frequently if you run very low velocity subsonic loads that produce more unburned powder, or if you run the suppressor wet (which speeds fouling accumulation). The cleaning process: disassemble the baffle stack fully per the manufacturer’s instructions; soak individual baffles in a rimfire-rated solvent such as Bore Tech Rimfire Blend, Hoppe’s #9, or Strike Carbon Remover for 20–30 minutes minimum (one hour for heavy fouling); scrub with a nylon or bronze brush, focusing on the leading face of each baffle and the bore channel; rinse with clean solvent or water if the product permits; dry completely with lint-free patches; and allow to air-dry completely before reassembly. Never use acetone, MEK, or other harsh organic solvents on aluminum components — these can attack anodizing and soften aluminum alloy.
How to clean a suppressor: Centerfire Pistol Suppressor Cleaning
Centerfire pistol suppressors (.45 ACP, 9mm, .40 S&W) accumulate less fouling per round than rimfire suppressors but still require periodic cleaning, particularly since pistol ammunition uses lead or plated bullets that leave progressive deposits in the baffle stack. A reasonable cleaning interval for a pistol suppressor under moderate use is every 2,000–3,000 rounds. The cleaning process is similar to rimfire: disassemble the baffle stack; soak in a quality handgun or all-purpose solvent (Hoppe’s No. 9, Bore Tech C4 Carbon Remover, Ballistol) for 15–30 minutes; scrub each baffle; dry and reassemble. Pistol suppressor fouling is typically softer and less adhesive than rimfire fouling and responds well to solvent soaking without the extended dwell times that rimfire baffles require. For monocore pistol suppressors that cannot be fully disassembled but have removable end caps, flush the interior with solvent through the bore while scrubbing accessible surfaces, then dry thoroughly before storage.
How to clean a suppressor: Centerfire Rifle Suppressor Cleaning
Centerfire rifle suppressors accumulate the least fouling per round of any suppressor type, because high-velocity rifle loads burn more completely than pistol or rimfire loads and because the high gas energy blows more fouling out of the suppressor rather than depositing it on baffles. Cleaning intervals for centerfire rifle suppressors range from 3,000 rounds for high-volume 5.56 use to 10,000 rounds or more for .308 or larger calibers fired in moderate quantities. The cleaning process: disassemble per manufacturer’s instructions; apply a quality rifle solvent (Break-Free CLP, Hoppe’s No. 9, M-Pro 7 Gun Cleaner) to baffle surfaces; scrub with a bronze brush; wipe clean with lint-free patches; dry thoroughly. For heavily carbonized rifle baffles, a commercial carbon remover like Bore Tech C4 or Slip2000 Carbon Killer is more effective than general-purpose solvents. Ultrasonic cleaning in a solvent-compatible tank with a commercial ultrasonic solution is the most efficient method for rifle baffle stacks with heavy carbon accumulation.
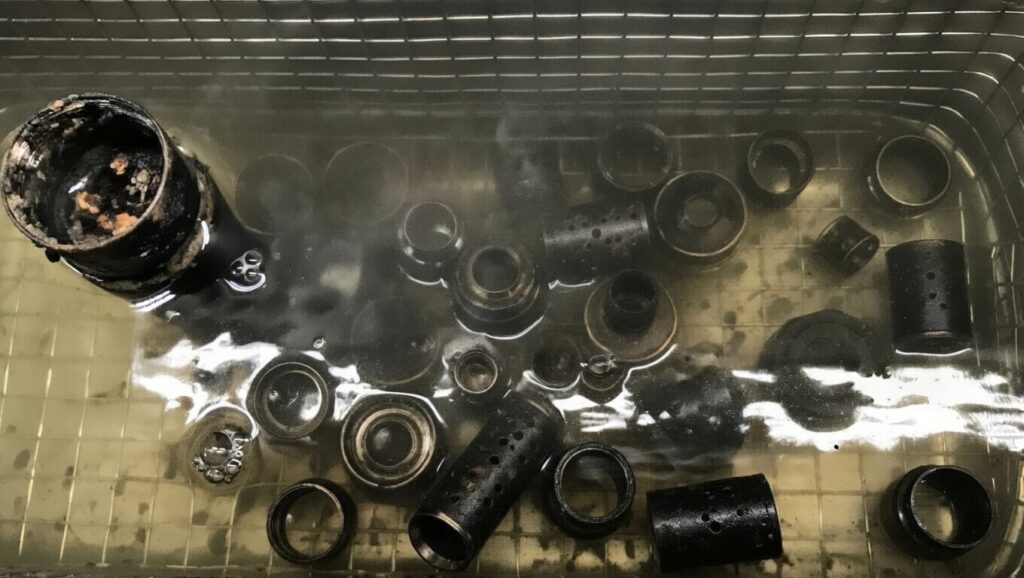
How to clean a suppressor: Ultrasonic Cleaning for Suppressors
An ultrasonic cleaner uses high-frequency sound waves transmitted through a liquid solution to agitate and dislodge fouling from metal surfaces — effectively cleaning areas that brushes and patches cannot reach. For rimfire suppressors in particular, ultrasonic cleaning dramatically outperforms manual solvent soaking and scrubbing in speed and thoroughness, removing lead and carbon deposits that would otherwise require extended soaking and aggressive scrubbing. Fill the ultrasonic tank with a commercial firearms cleaning solution (Hornady One Shot Sonic Cleaner Solution, Simple Green Pro HD, or dedicated ultrasonic cleaning concentrates), submerge the disassembled baffle stack, and run the cleaner at its recommended temperature and cycle time (typically 20–40 minutes at 140°F for heavy fouling). Rinse baffle components thoroughly with clean water after ultrasonic cleaning, dry completely, and apply a light protective coating before reassembly. Never put the outer suppressor tube in an ultrasonic cleaner if it has a cerakote or similar finish — ultrasonic cleaning can damage some external coatings. Confirm compatibility with the manufacturer before using ultrasonic cleaning on any suppressor component.
How to clean a suppressor: Thread Lubrication at Reassembly
Proper thread lubrication during reassembly is critical for preventing the carbon seizure that occurs when suppressor threads are assembled dry and exposed to high temperatures during firing. Carbon from propellant gases deposits in the threads during firing and, without lubrication, bonds to the thread surfaces and effectively welds the components together, making future disassembly impossible or damaging the threads when forced. The correct solution: apply a thin coat of anti-seize compound (Nickel Anti-Seize, Copper Never-Seez, or a suppressor-specific thread lubricant) to male threads before assembly. Tighten to hand-tight plus a quarter turn — over-tightening creates its own seizure risk. For suppressors that use timed (indexed) thread assemblies that must align in a specific orientation, follow the manufacturer’s alignment procedure carefully rather than over-tightening to an arbitrary torque spec. Never use petroleum-based oils or grease on suppressor threads — these burn off immediately in service and leave carbon residue that is worse than running dry.
What Not to Do When Cleaning a Suppressor
Several common cleaning mistakes cause more harm than the fouling they are meant to remove. Never use steel cleaning brushes on aluminum baffle surfaces — steel scratches aluminum and removes protective anodizing, creating raw aluminum surfaces that corrode faster than coated ones. Never use acetone, lacquer thinner, or strong organic solvents on aluminum-body suppressors — these attack the anodizing and can soften aluminum alloys. Never attempt to clean a sealed (fully welded) suppressor by disassembly — the end caps are not designed for removal and forcing them will damage the unit. Never leave a suppressor soaking in solvent for days or weeks — extended solvent exposure can affect seals, coatings, and in some designs, adhesive-bonded components. Never reassemble a suppressor with wet or oil-contaminated baffles — excess solvent or oil inside the suppressor will smoke heavily on the first shots and may cause a pressure spike. Always dry completely before reassembly.
Frequently Asked Questions About Cleaning User-Serviceable Suppressors
How do I know when my suppressor needs cleaning?
The most reliable indicator is noticeably increased sound levels compared to when the suppressor was clean. As fouling accumulates in the baffles, gas flow is restricted, back-pressure changes, and the suppressor becomes measurably louder — often by 3–5 decibels in a heavily fouled rimfire can. In user-serviceable suppressors, physical inspection of the baffle faces after disassembly reveals accumulated carbon and lead deposits visually. For preventive maintenance rather than reactive cleaning, follow the interval guidelines for your caliber and use intensity: 500–1,000 rounds for rimfire, 2,000–3,000 for pistol calibers, 3,000–10,000 for centerfire rifle. Cleaning before these intervals is never harmful; waiting significantly beyond them risks seized components and accelerated erosion.
Can I use Hoppe’s No. 9 to clean my suppressor?
Yes. Hoppe’s No. 9 is safe for use on steel, stainless steel, and titanium suppressor components. It is an effective general-purpose solvent for carbon and lead fouling. For aluminum-body or aluminum-baffle suppressors, Hoppe’s No. 9 is generally safe for short contact times (30 minutes or less) but should be rinsed off promptly rather than left in extended contact with aluminum. For rimfire suppressors with heavy lead deposits, a solvent specifically rated for lead dissolution — Bore Tech Rimfire Blend or Shooter’s Choice Lead Remover — will perform significantly better than Hoppe’s No. 9. Always rinse off any solvent and dry completely before reassembly.
What do I do if my suppressor baffles are seized and won’t disassemble?
Carbon-seized suppressor components can often be freed with careful application of penetrating solvent (a 50/50 mix of ATF fluid and acetone, penetrating oil, or commercial thread-loosening products like PB Blaster), followed by patient application of force with the correct suppressor wrench — never pliers, adjustable wrenches, or improvised tools. Apply solvent to the seized joint, allow several hours of penetration, then apply gradual rotational force with the manufacturer’s wrench. If components remain seized after multiple penetrating solvent cycles, contact the manufacturer — attempting to force a seized suppressor with excessive torque risks stripping the threads or crushing the tube, requiring professional repair or replacement. Many manufacturers offer a cleaning or rebuild service for heavily neglected suppressors.
Disclosure: PopularSuppressors.com is operated by Brand Avalanche Media, Inc. This article contains information about suppressor maintenance. It is not legal advice. Always follow your specific suppressor manufacturer’s cleaning instructions. Silencer Central is a paid sponsor of this website.
Similar Posts


Frequently Asked Questions
How do I disassemble a user-serviceable suppressor for cleaning?
Most user-serviceable suppressors unscrew at the end cap — hand-tight counterclockwise from the muzzle end. Some require a suppressor wrench for stubborn end caps. Once open, individual baffles stack out in order — photograph the stack before disassembly to ensure correct reassembly.
What solvent is safe to use when cleaning suppressor baffles?
Approved solvents include Hoppes No. 9, Slip 2000 Carbon Killer, and dedicated suppressor cleaning solutions. After solvent soaking, scrub with a bronze brush — not steel — and rinse with isopropyl alcohol before reassembling dry.
How do I know if my suppressor is user-serviceable?
Check your suppressor's documentation. Silencer Central's BANISH suppressors are all user-serviceable with disassembly instructions included. Most stainless steel and titanium suppressors can be disassembled; welded aluminum suppressors typically cannot. Never attempt to disassemble a sealed suppressor.